Open-source Android VPN Stack Suite 0.0.1.1

Open-source Android VPN Stack Suite 0.0.1.1 has been released.

Supported platforms:

  • Android (sdk >= 26)
  • Examples (demo files, result files, log files), screenshots:
    Examples

Verification of downloaded files:
—————-

GPG Public Key (SManSoft ECDSA Key) <info@smansoft.com> has been published here: http://smansoft.com/gpg/smansoft.pub.asc.
Android VPN Stack Suite – 0.0.1.1 contains suite of [some_install_file].asc files.
Please, use:
gpg --import ./smansoft.pub.asc
for importing of key and
gpg --verify ./[some_install_file].asc ./[some_install_file]
or
gpg --verify ./[some_install_file].asc
for verification of files, published on this site.
Public GPG ECDSA Key can be imported, using
gpg --keyserver hkp://pgp.mit.edu --recv-keys A408B0FCFD774649
too.

Features of the Android VPN Stack Suite:

  • Simple TCP/UDP socket server (with multi-thread support) (Linux platform), that implements open simple communication protocol (application level):
    • TCP:
      • The Client connects to the TCP Server;
      • The Client sends “socket_client: Hello” to the Server;
      • The Server reads message from the Client;
      • The Server sends “socket_server: Hello” to the Client;
      • The Client reads message from the Server;
      • The Client sends some text message (size 1024 with ‘\0’ symbol)  to the Server;
      • The Server reads text message from the Client and generates inverted message (src: “1234567890” -> inverted: “0987654321”);
      • The Server sends inverted message to the Client;
      • The Client reads message from the Server;
      • The Client send read message to the Server;
      • The Server reads text message from the Client and generates inverted message (src: “0987654321” -> inverted: “1234567890”);
      • The Server sends inverted message to the Client;
      • The Client reads message from the Server;
      • Last received message by the Client should be similar to the first message sent by Client to the Server;
    • UDP:
      • The Client connects to the TCP Server;
      • The Client sends “socket_client: Hello” to the Server;
      • The Server reads message from the Client;
      • The Server opens new UDP connection on new socket port;
      • The Server sends new UDP port number to the Client (using first connection);
      • The Client reads the UDP port number and closes first connection;
      • The Client creates new UDP connection, using received from Server port number;
      • The Client sends “socket_client: Hello” to the Server;
      • The Server reads message from the Client;
      • The Server sends “socket_server: Hello” to the Client;
      • … Then communication protocol (application level) is same as described in TCP section;
  • Simple TCP/UDP socket client (Microsoft Visual Studio C++, Windows platform), that implements previous described protocol;
  • Simple TCP/UDP socket client (Android Studio/Android SDK, Android platform), that implements previous described protocol;
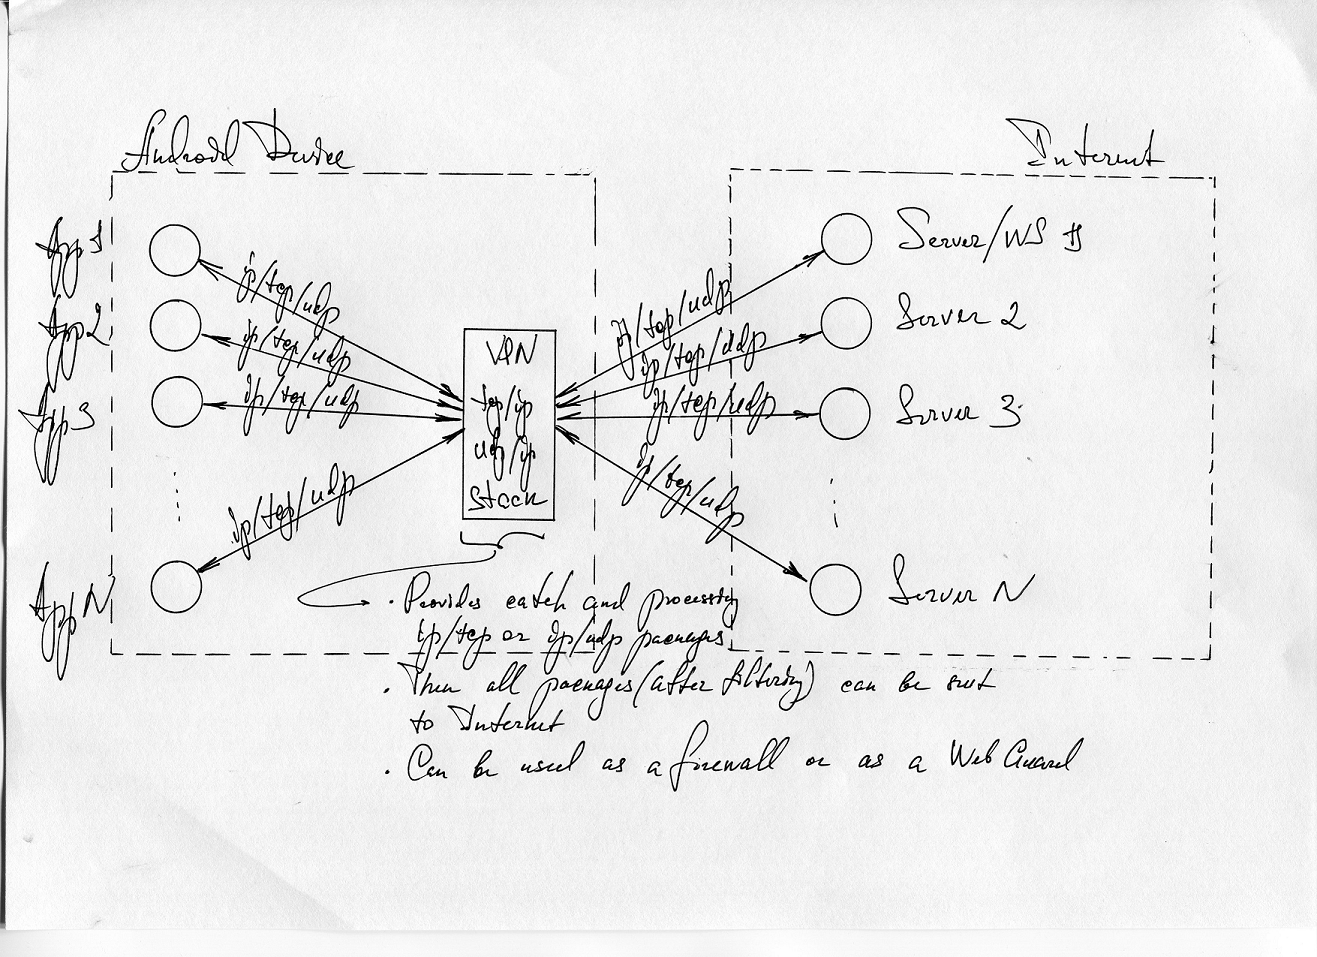
  • VPN Stack Application, that (Android Studio/Android SDK/Android NDK/C, Android platform), that is based on VpnService (Android platform) and implements intermediate IP/TCP/UDP stack (JNI/C/Sockets);
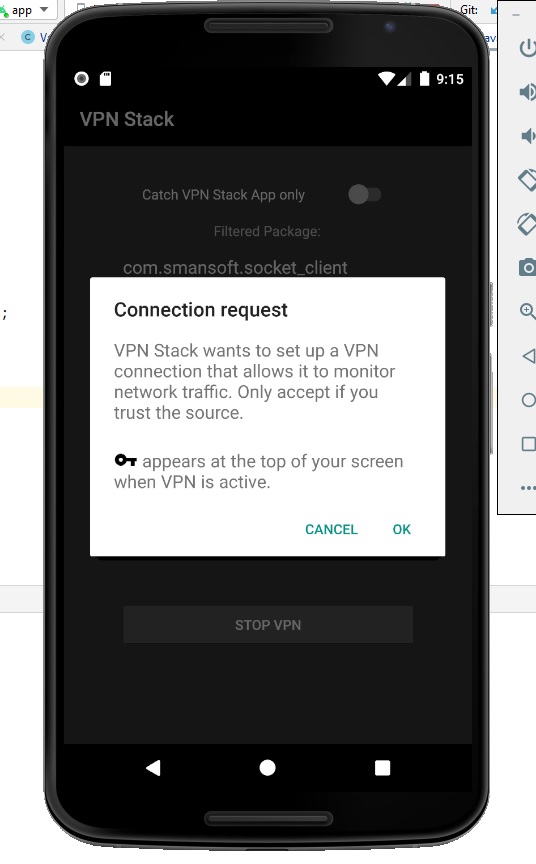
  • VPN Stack Application provides catching, monitoring and processing TCP/UDP/ICMP/IP packages; Then these packages are processed (via JNI) at the Native API level;
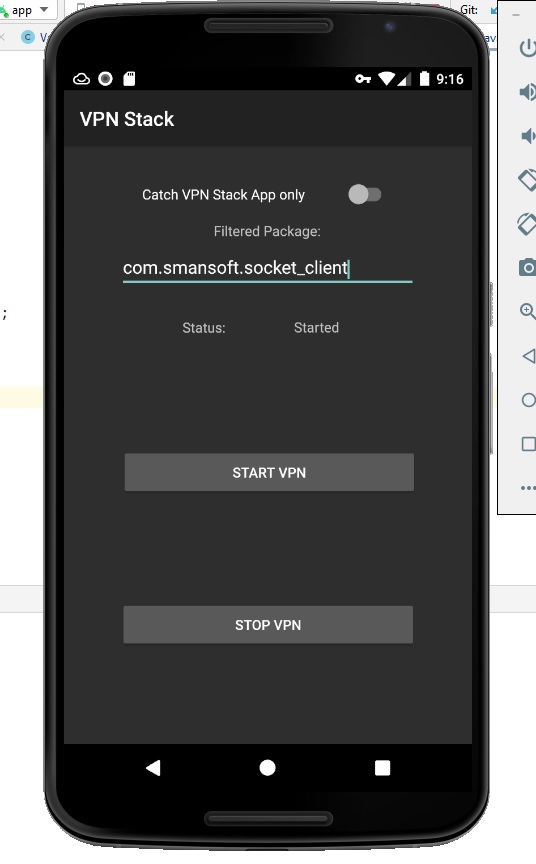
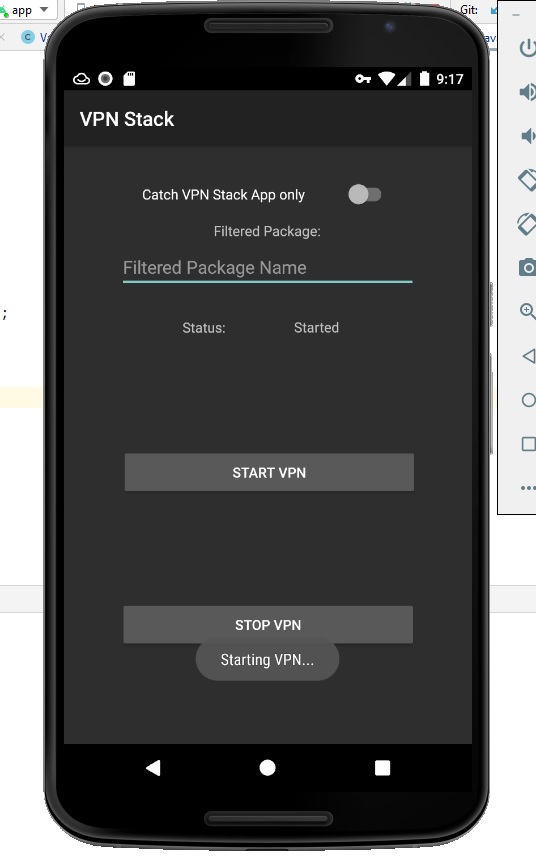
  • VPN Stack Application can catch packages from some defined application (if text edit “Filtered Package Name” is defined) or from all applications (if text edit “Filtered Package Name” is empty);
  • VPN Stack Application creates tun0 device (after launching), which is used for catching TCP/UDP/ICMP/IP packages;
  • VPN Stack Application reads packages, sent from Android application(s) from tun0 device, provides processing these packages and creates new or uses saved (sessions) TCP connections (if Android Application sends TCP package) or just uses sendto (if Android Application sends TCP package);
  • VPN Stack Application receives all packages from network, provides processing these packages and writes packages to tun0 device, then packages will be received by Android application(s);
  • VPN Stack Application doesn’t use Raw Sockets;
  • VPN Stack Application writes detailed log to Logcat and to the file
    /data/data/com.smansoft.vpn_stack/files/logs/vpn_stack.log;
  • Follow applications from this suite:
    • Simple TCP/UDP socket server (with multi-thread support) (Linux platform);
    • Simple TCP/UDP socket client (Microsoft Visual Studio C++, Windows platform);
    • Simple TCP/UDP socket client (Android Studio/Android SDK, Android platform) have been created and have been used for testing network connections and for testing the VPN Stack Application;

VPN Stack Application implements follow schema of network stack processing:
vpn_stack.png

Demo of the sm_vpn_stack_suite (Open-source Android VPN Stack Suite):
—————-

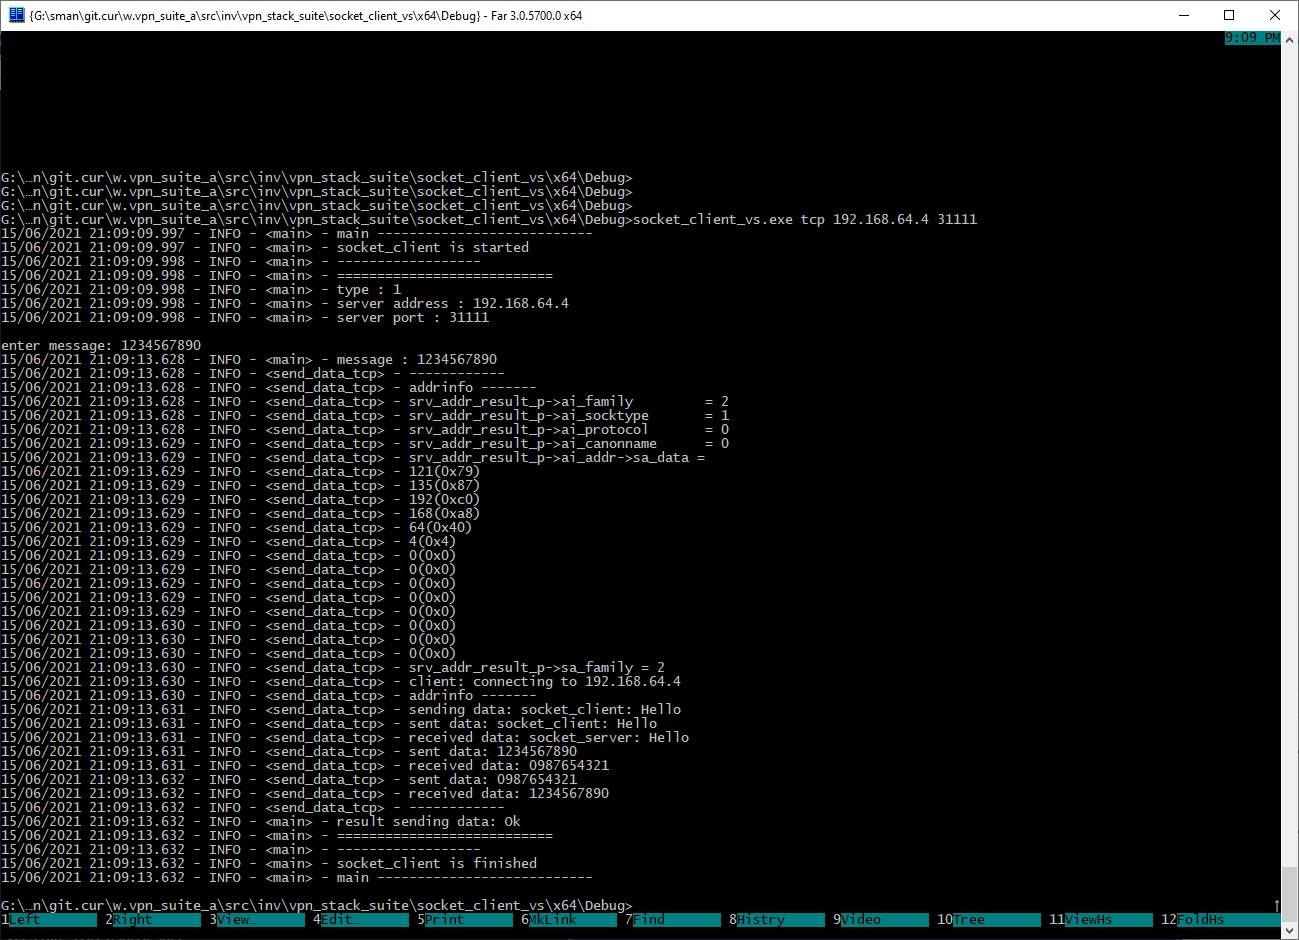
Here are results of the execution (log files and screenshots) of the socket_client_vs on Windows 10 x64.

socket_client_vs.1.log
socket_client_vs.2.log

socket_client_vs (Windows 10 x64)
socket_client_vs.1.jpg

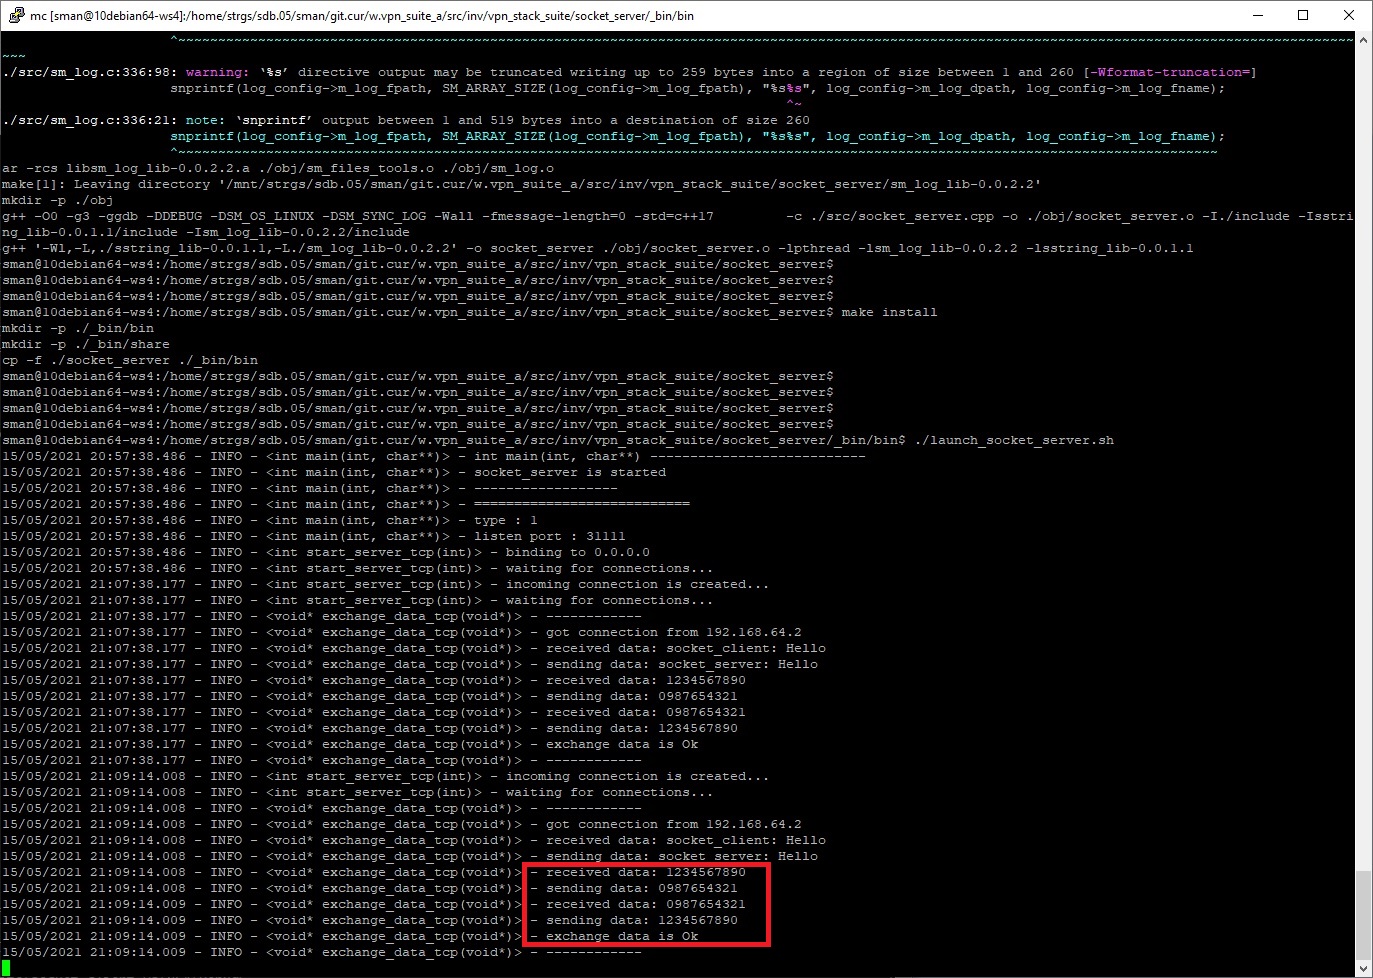
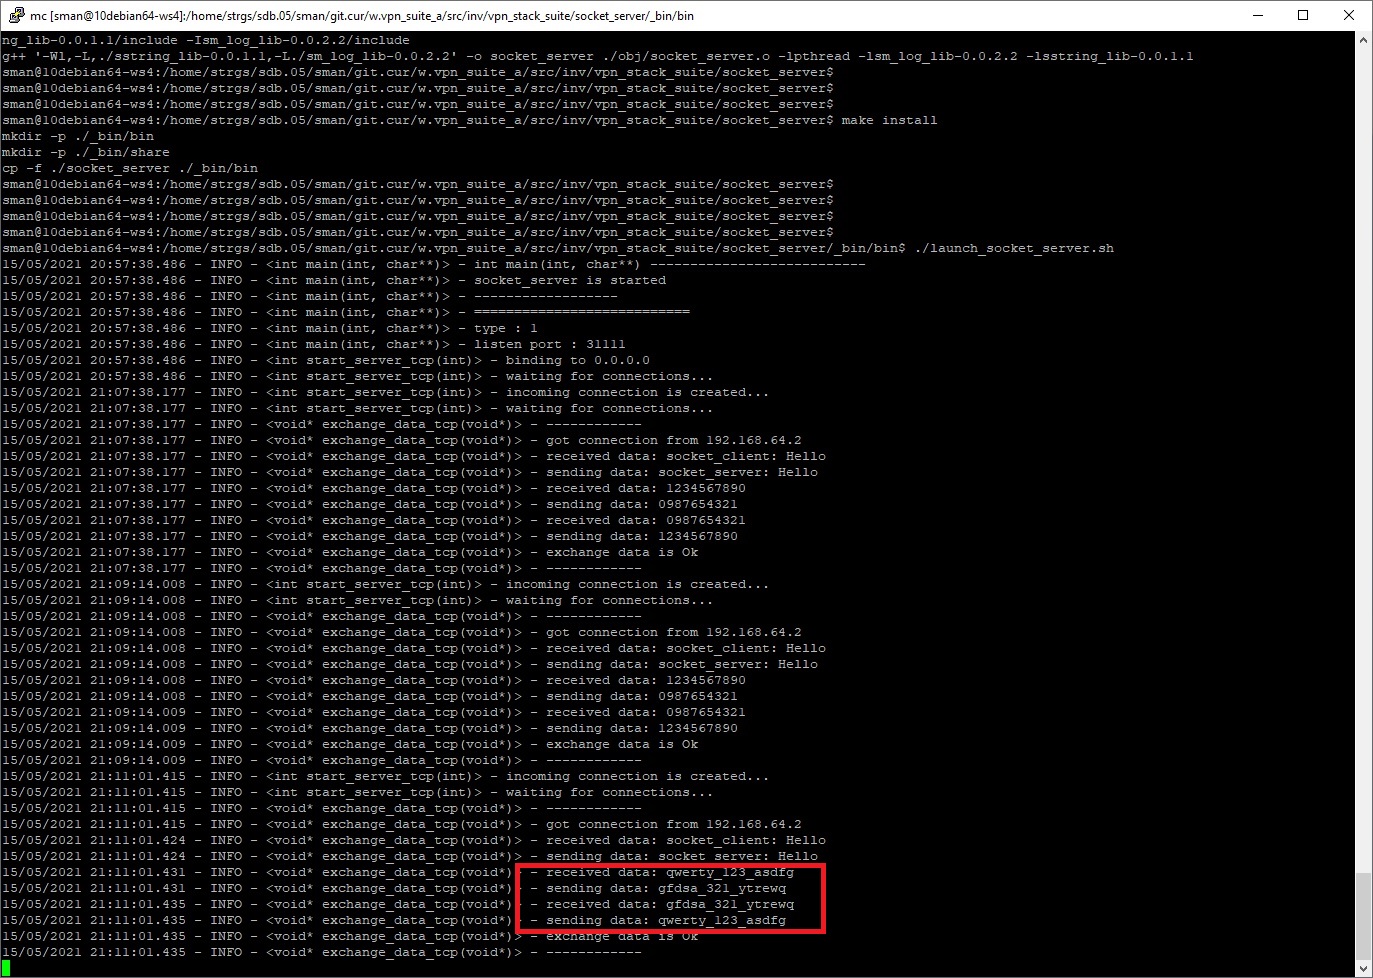
Here are results of the execution  (log files and screenshots) of the socket_server on Linux Debian 10 x64.

socket_server.1.log
socket_server.2.log

socket_server (Debian 10 x64)
socket_server.1.jpg
socket_server.2.jpg

Here are results of the execution (screenshot) of the socket_client on Android 8.0 (API 26) x64.

socket_client.1.jpg

Here are results of the execution  (log files and screenshots) of the vpn_stack on Android 8.0 (API 26) x64.

vpn_stack.1.log
vpn_stack.2.log

socket_server (Debian 10 x64)
vpn_stack.1.jpg
vpn_stack.2.jpg
vpn_stack.3.jpg
vpn_stack.4.jpg

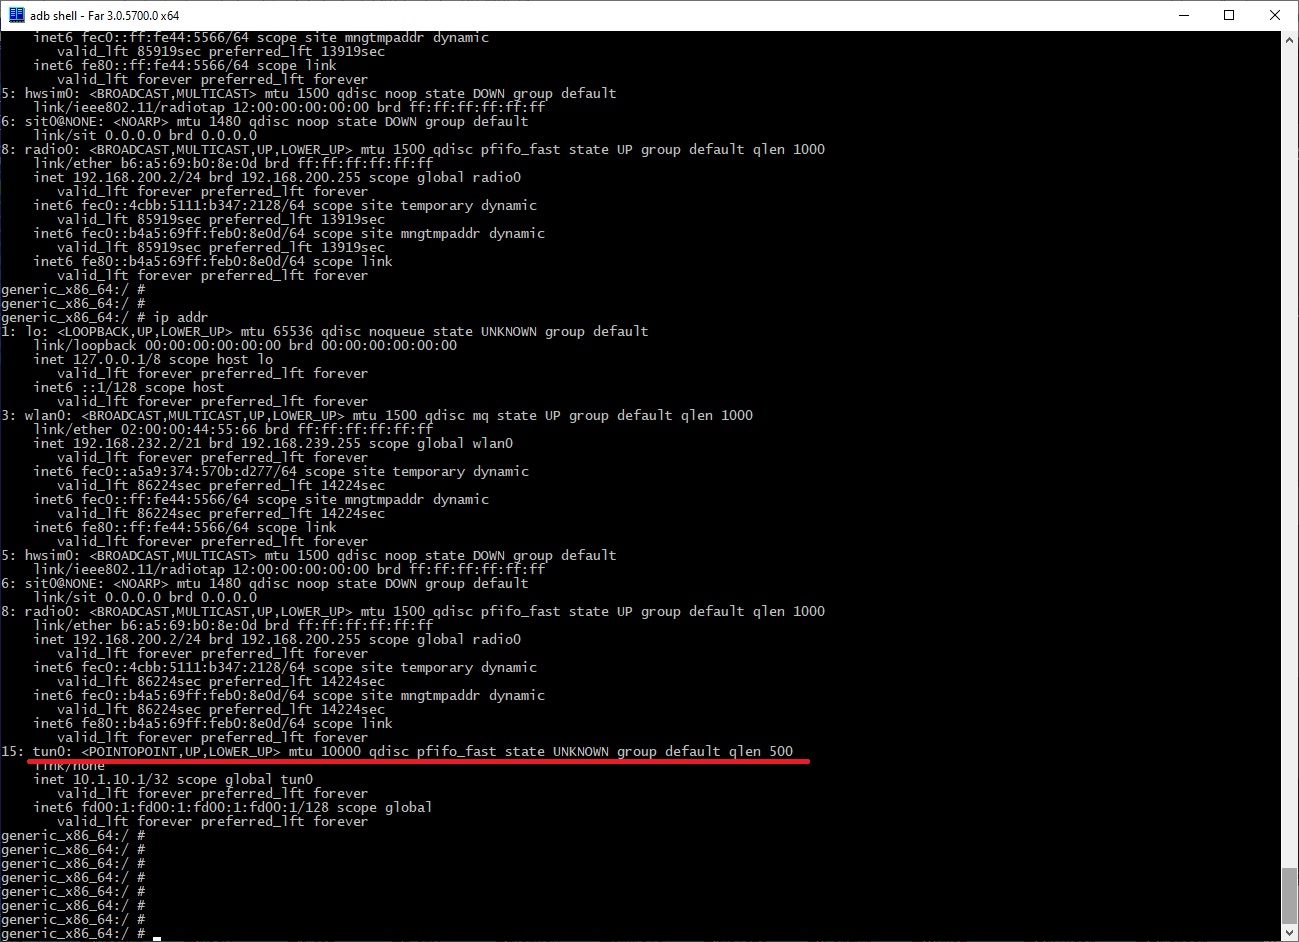
Here is list of network interfaces before launching the VPN Service.
ip_addr.1.jpg
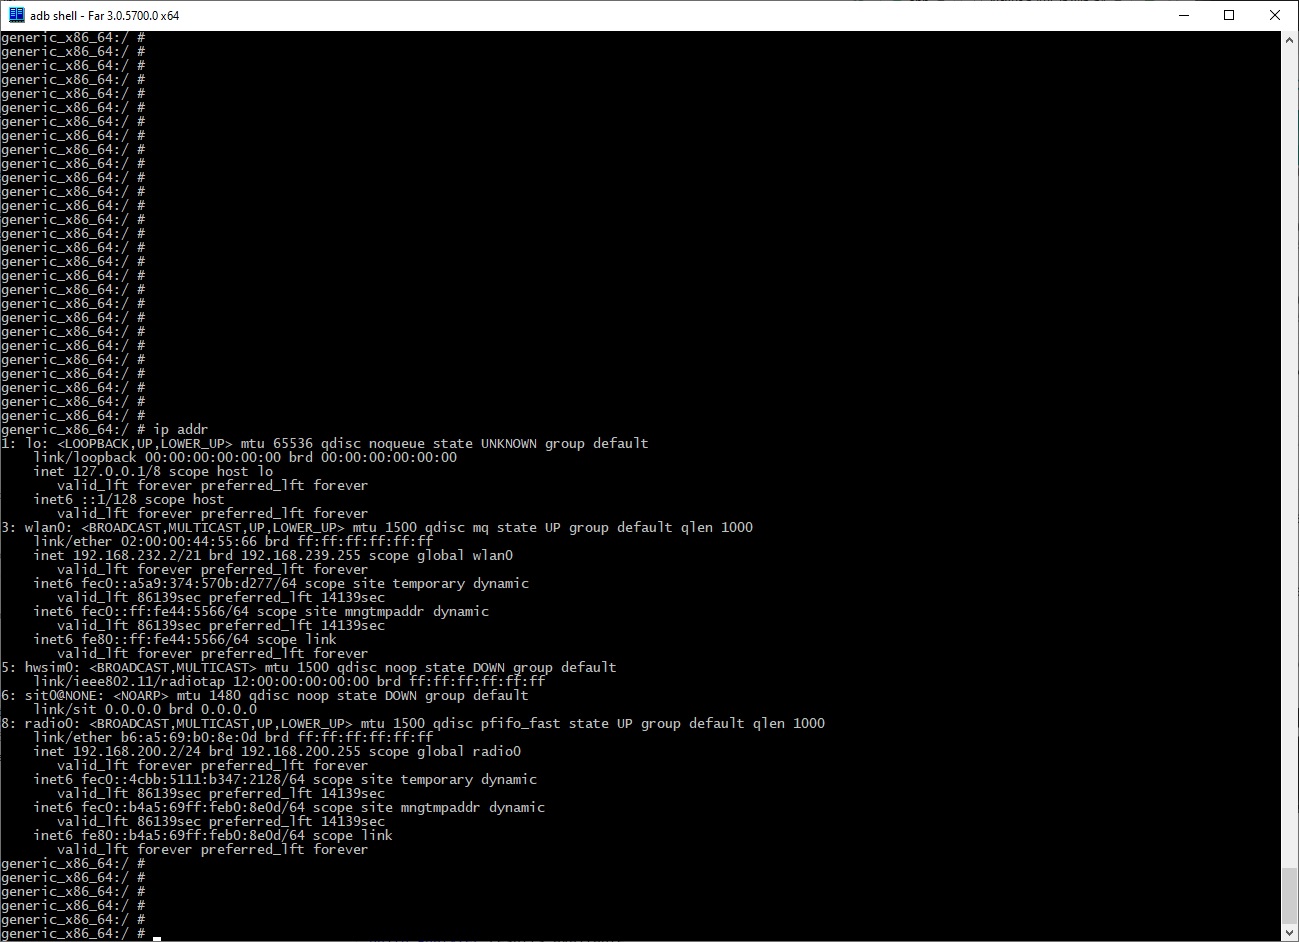
Here is list of network interfaces after launching the VPN Service. Device tun0 (is used for catching the network traffic) has been added.
ip_addr.2.jpg

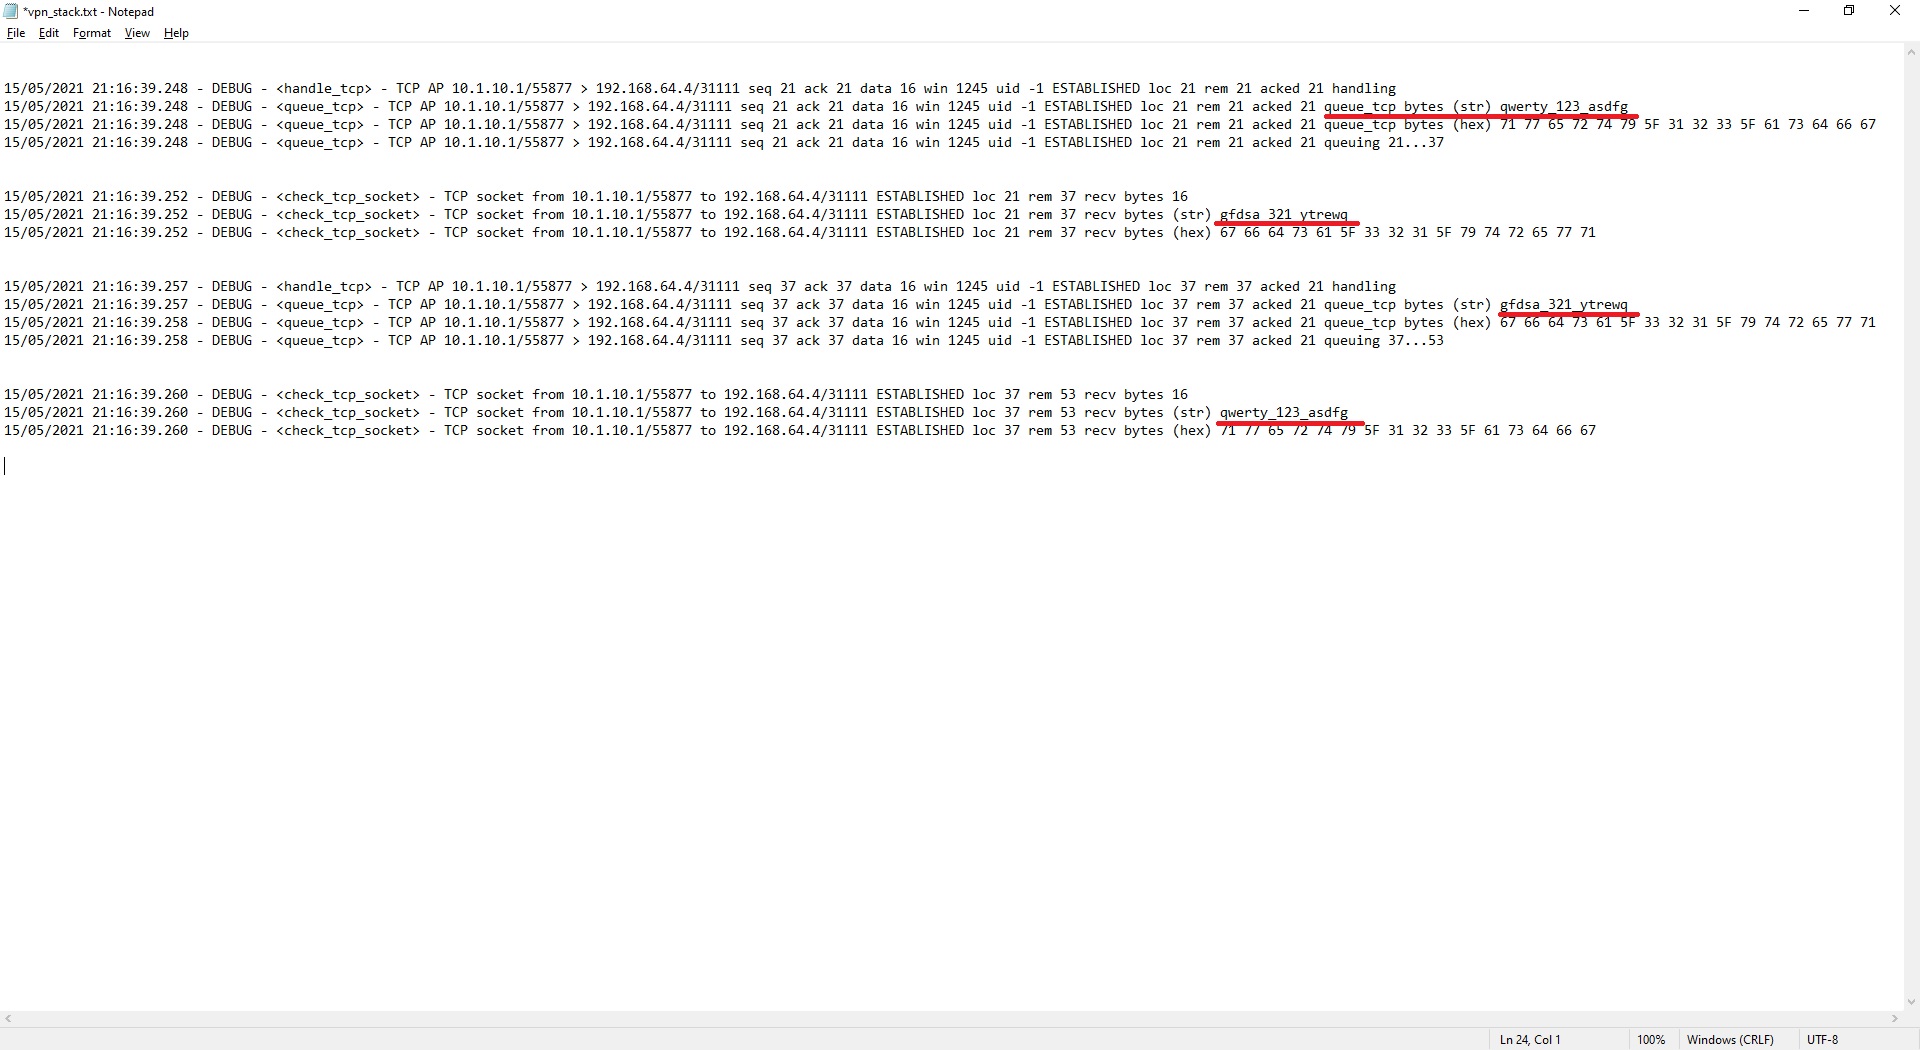
Here are selected results (from vpn_stack.1.log and vpn_stack.2.log):

vpn_stack.1.txt
vpn_stack.2.txt

vpn_stack.5.jpg
vpn_stack.6.jpg

sm_vpn_stack_suite (Android VPN Stack Suite) 0.0.1.1 ® Copyright © 2021 by SManSoft.

Spring Login (Stack Templates) with HTTPS

Spring Login (Stack Templates) with HTTPS.

sl-jsp-djpa-jc-hib-ehc3-ssl on GitHub
Spring Login (Stack Templates)
Spring Login (Stack Templates) on GitHub

Demo project (Spring, Spring Boot, Spring-Security, JSP, Apache Tiles, Spring-Jpa, Spring-Data-Jpa, JCache, Ehcache, Hibernate, MySQL, Logback, Maven, Gradle) with HTTPS has been added to Spring Login Suite:

sl-jsp-djpa-jc-hib-ehc3-ssl (Spring Login with HTTPS)

  • Spring Boot
  • JSP + Apache Tiles 3
  • Spring MVC + Spring-Security
  • DAO (Spring Data JPA)
  • JCache
  • Hibernate
  • Ehcache3

Project sl-jsp-djpa-jc-hib-ehc3-ssl  contains functionality like in sl-jsp-djpa-eclnk-cache project.

Application sl-jsp-djpa-jc-hib-ehc3-ssl creates default Root Admin (login: ‘root‘ passw: ‘root‘). Root Admin can’t be removed, but can be updated (for ex. passw value).

You can launch built application as using java -jar sl-jsp-djpa-jc-hib-ehc3-ssl.war as you can deploy him to your Java Servlet Container.

If you build sl-jsp-djpa-jc-hib-ehc3-ssl with current version of  src/main/resources/srv.sl.p12, you will need to import CA certificate (as trusted, for ex. Trusted Root CA) from current version ssl/ssl.ecdsa.ca/out/ca.sl.pem. Also you can extract CA certificate from src/main/resources/srv.sl.p12.

Please, and send your notes and questions to info@smansoft.com.

SSL Web scripts

SSL Web scripts.

SSL Web scripts on GitHub
sl-jsp-djpa-jc-hib-ehc3-ssl (Spring Login with HTTPS)

SSL Web scripts is a suite of scripts for generation X.509 keys/certificates for Web Applications.

Overview
—————-

SSL Web scripts generates X.509 keys/certificates, using as RSA as ECDSA. The main features of SSL Web scripts:

  • generation of CA ECDSA key and Self-Signed CA ECDSA Certificate;
  • generation of SSL ECDSA private key, ECDSA public key and sign ECDSA public key, using ECDSA CA key and generation of X.509 certificate of server (server certificate);
  • generation of CA RSA key and Self-Signed CA RSA Certificate;
  • generation of SSL RSA private key, RSA public key and sign RSA public key, using RSA CA key and generation of X.509 certificate of server (server certificate);
  • usage (by default) of Elliptic Curves (ECDSA-WITH-SHA256) prime256v1 (NIST P-256, secp256r1) or RSA (RSA2048-WITH-SHA256) for signing of public keys;

Usage
—————-

Suite of scripts generates/uses follow files (extensions):

  • .key  – private key (ECDSA or RSA) in PEM format;
  • .pub  – non-signed public key (ECDSA or RSA) in PEM format;
  • .csr   –  certificate request (for signing) of public key;
  • .cert  – signed public key (ECDSA or RSA) (certificate) with additional text info in PEM format;
  • .pem  – signed public key (ECDSA or RSA) (certificate) in PEM format;
  • .chain.pem  – file, that contains list of authorized certificate(s), including root CA;
  • .p12    – archive (in PKCS12 format), that contains private key, public key (certificate), and authorized certificate(s);

Suite of scripts contains follow directories:

ssl.ecdsa.ca
ssl.rsa.ca

  • suite of scripts (using ECDSA/RSA), that:
    • generates CA keys (private and public);
    • generates CA Certificate Request;
    • self-signs of CA Certificate Request;
    • generates Server keys (private and public);
    • generates Server Certificate Request (for signing, by CA key);
    • signs of Server Certificate Request, by CA key;
    • imports of signing of Server Certificate Request, by CA key;
  • files/dirs:
    • cnfs/openssl.ca.int.cnf – configuration file, that is used for generation of CA key pair and self-signing of CA Certificate Request;
    • cnfs/openssl.ca.srv.cnf – configuration file, that is used for signing of Server Certificate Request;
    • cnfs/openssl.srv.cnf – configuration file, that is used for generation of Server key pair and generation of Server Certificate Request;
    • out – directory, that contains all generated keys, certificates and .p12 (PKCS12 archive);
    • ssl.ecdsa.ca.ini – base ini file, that is used by ECDSA scripts;
    • ssl.rsa.ca.ini – base ini file, that is used by RSA scripts;
    • 01.init.sh – bash script, that clears all dirs and removes all keys and certificates;
    • 02.ca.sh – bash script, that creates CA key pair, generates CA Certificate Request and self-signs of CA Certificate Request;
    • 03.srv.sh – bash script, that creates Server key pair, generates Server Certificate Request, signs Server Certificate Request by CA key and exports Server key and certificates to PKCS12 (.p12) file;

ssl.ecdsa.req
ssl.rsa.req

  • suite of scripts (using ECDSA/RSA), that:
    • generates Server keys (private and public);
    • generates Server Certificate Request (for signing, by CA key);
    • signs of Server Certificate Request, by CA key;
  • files/dirs:
    • cnfs/openssl.srv.cnf – configuration file, that is used for generation of Server key pair and generation of Server Certificate Request;
    • out – directory, that contains of Server key, certificates and .p12;
    • ssl.ecdsa.req.ini – base ini file, that is used by ECDSA scripts;
    • ssl.rsa.req.ini – base ini file, that is used by RSA scripts;
    • 01.init.sh – bash script, that clears all dirs and removes all keys and certificates;
    • 02.srv.req.sh – bash script, that Server key pair and generates Server Certificate Request;
    • 03.srv.imp.sh – bash script, that exports Server key, signed certificate and CA certificates to PKCS12 (.p12) file;

ssl.ecdsa.sign
ssl.rsa.sign 

  • suite of scripts (using ECDSA/RSA), that:
    • generates CA keys (private and public);
    • generates CA Certificate Request;
    • self-signs of CA Certificate Request;
    • signs of Server Certificate Request, by CA key;
  • files/dirs:
    • cnfs/openssl.ca.int.cnf – configuration file, that is used for generation of CA key pair and self-signing of CA Certificate Request;
    • cnfs/openssl.ca.srv.cnf – configuration file, that is used for signing of Server Certificate Request;
    • out – directory, that contains CA key and certificates;
    • ssl.ecdsa.sign.ini – base ini file, that is used by ECDSA scripts;
    • ssl.rsa.sign.ini – base ini file, that is used by RSA scripts;
    • 01.init.sh – bash script, that clears all dirs and removes all keys and certificates;
    • 02.ca.sh – bash script, that creates CA key pair, generates CA Certificate Request and self-signs of CA Certificate Request;
    • 03.srv.sign.sh – bash script, that signs Server Certificate Request by CA key;

If you use ssl.ecdsa.req/ssl.rsa.req and ssl.ecdsa.sign/ssl.rsa.sign together, you should:

  1. call:
    ssl.ecdsa.sign/02.ca.sh or ssl.rsa.sign/02.ca.sh
  2. call:
    ssl.ecdsa.req/02.srv.req.sh or ssl.rsa.req/02.srv.req.sh
  3. copy:
    ssl.ecdsa.req/out/srv.sl.csr or ssl.rsa.req/out/srv.sl.csr
    to
    ssl.ecdsa.sign/out or ssl.rsa.sign/out
  4. call:
    ssl.ecdsa.sign/03.srv.sign.sh or ssl.rsa.sign/03.srv.sign.sh
  5. copy:
    ssl.ecdsa.sign/out/srv.sl.cert or ssl.rsa.sign/out/srv.sl.cert
    and
    ssl.ecdsa.sign/out/ca.sl.cert or ssl.rsa.sign/out/ca.sl.cert
    to
    ssl.ecdsa.req/out or ssl.rsa.req/out
  6. call:
    ssl.ecdsa.req/03.srv.imp.sh or ssl.rsa.req/03.srv.imp.sh

You can use result files: ca.sl.cert/ca.sl.pemsrv.sl.cert/srv.sl.pem, srv.sl.key or srv.sl.p12 in Web Applications/Servers.

Files openssl.xxx.srv.cnf contain section:
[alt_names]
DNS.1=localhost
DNS.2=*.localhost
You can change domain name(s) to some other or add some new domain name(s).

In practice, you should generate Server key pair, generate Certificate request, sign Server certificate request, using official Authorized Centers and then import results to srv.sl.p12.

Read ReadMe.txt for more info.
SSL Web scripts is a free software distributed under the MIT.
Read License.txt for more information about license.

Please, send your notes and questions to info@smansoft.com.

SSL Web scripts ® Copyright © 2018-2019 by SManSoft

Spring Login (Stack Templates)

Spring Login (Stack Templates).

Spring Login (Stack Templates) on GitHub

Suite of demo projects (Spring, Spring Boot, Spring-Security, JSP, Apache Tiles, Thymeleaf, Spring-Jpa, Spring-Data-Jpa, JCache, Ehcache, Infinispan, Hibernate, EclipseLink, MySQL, Logback, Maven, Gradle).

This Suite contains follow demo/template projects:

print-tool (Print Tool)

scripts

  • Scripts for creating/init/drop of database;

sl-jsp-hib-ehc2 (Spring Login)

  • Spring Boot
  • JSP
  • Spring MVC + Spring-Security
  • DAO (using Hibernate Session Factory)
  • Hibernate
  • Ehcache2

sl-jsp-jpa-hib-ehc2 (Spring Login)

  • Spring Boot
  • JSP
  • Spring MVC + Spring-Security
  • DAO (using JPA EntityManager)
  • Hibernate
  • Ehcache2

sl-jsp-djpa-jc-hib-ehc3 (Spring Login)

  • Spring Boot
  • JSP
  • Spring MVC + Spring-Security
  • DAO (Spring Data JPA)
  • JCache
  • Hibernate
  • Ehcache3

sl-jsp-djpa-jc-hib-infsp (Spring Login)

  • Spring Boot
  • JSP
  • Spring MVC + Spring-Security
  • DAO (Spring Data JPA)
  • JCache
  • Hibernate
  • Infinispan

sl-jsp-djpa-eclnk-cache (Spring Login)

  • Spring Boot
  • JSP + Apache Tiles 3
  • Spring MVC + Spring-Security
  • DAO (Spring Data JPA)
  • EclipseLink
  • EclipseLink Cache

These projects can be used as templates for creation of new Java Spring Framework projects.

Project sl-jsp-djpa-eclnk-cache contains more advanced gui, more roles and more advanced implementation of auth (please, see screenshots here: screenshots).
Also sl-jsp-djpa-eclnk-cache creates default Root Admin (login: ‘root‘ passw: ‘root‘). Root Admin cann’t be removed, but can be updated (for ex. passw value).

You can launch built applications as using java -jar sl-xxx.war as you can deploy them to your Java Servlet Container.

Please, and send your notes and questions to info@smansoft.com.

Java Print Tool

Reflection-based suite of facades over Logger, that provides logging of complex objects.

Print Tool (print-tool) on GitHub

Overview
—————–

Some time, it’s necessary to save in log complex objects (VO, DTO, Entities and some other POJO).

The main features of Print Tool:

– facade over Logger, that allows to solve (using reflection) and print header and footer of output of some function; in this case you don’t need to care about name of function, if it has been renamed/re-factored;

private static final IPrintTool printTool = PrintTool.getPrintToolInstance(LoggerFactory.getLogger(TestPrintTool.class));

public void testPrintTool() {
	printTool.debug(PrintSfx.SFX_IN);
	// some code here
	printTool.debug(PrintSfx.SFX_OUT);
}
 

– provides solving of all fields of complex objects (including aggregated objects) and print values of all fields; in this case you need to use only:

IpVO ipVO;
AddressReqVO addressReqVO;

// init of objects ipVO and addressReqVO

printTool.info(ipVO);
printTool.info(addressReqVO);

– provides interface, that allow to override print of complex objects
(please, see interface com.smansoft.tools.print.api.IPrintable in sources);

As result, usage of Print Tool in function:

private static final IPrintTool printTool = PrintTool.getPrintToolInstance(LoggerFactory.getLogger(TestPrintTool.class));

@Test
public void testPrintTool() {
	printTool.debug(PrintSfx.SFX_IN);

	printTool.info(ipVO);
	printTool.info(addressReqVO);

	printTool.debug(PrintSfx.SFX_OUT);
	Assert.assertTrue(true);
}

generates follow log output:
print-tool-tests.log

You can find sources of Print Tool here:
Print Tool (print-tool) on GitHub

Please, see example of usage of the Print Tool in Unit Test code. Also you can find usage of this project here:
Spring Login (Stack Templates)